I had dinner with friends this week and I brought up how good yogurt was on chili. We got to talking about how high priced everything is and I mentioned I made my own yogurt. If you have my basic Cd you have my yogurt recipe but here it is step by step. You can do amazing things with a jar of yogurt in the fridge. Tonight I'll tell you my favorite yogurt uses. But now it's time to go step by step
1) Everything must be clean. I rinse any bowls that have been in my cupboard. I pride myself in doing things quickly. Even rinse the Temperature gauge in hot water, any spoons you stir with. This is to make sure we only grow the correct culture and not something on our bowl or spoon.
Measure 3 tablespoons to 1/4 cup of yogurt into a small bowl. This needs to come to room temperature so just let it sit. This can be yogurt you save from your last batch which is what I do. You may buy plain cultured yogurt. Nancy's has natural yogurt that is perfect. Read the label and make sure it has live culture. Many brands no longer do. Amazing a cultured milk without the culture! we can cover this in another blog. My Nancy's plain carton says it has milk, L. Acidophilius, S. Thermophilus, L. bulgaricus, L. caset, L. rhamnosus, and Bbifidum cultures. Sounds like lots of culture going on. Aim for L. Acidophilius when you buy you plain yogurt.
STEP 2 Measure 1 quart of milk. This is 2% but you may use whole milk, 1%, half and half, cream, non-fat (my least favorite texture) or powdered milk which you will need additional directions for.
 Measure 1 quart of milk. This is 2% but you may use whole milk, 1%, half and half, cream, non-fat (my least favorite texture) or powdered milk which you will need additional directions for.
 I heat the milk in my microwave oven. It never scorches the milk.
If you use powdered milk heat the water to 210 degrees F. Then add your powder. Continue with directions below at the cool down point.
 You have your choice of Temperature gauges. They need to be able to go as high a 210 degrees F (99C) and as low as 110 degrees F (43C)
 I have a K-tel 1 quart size yogurt maker but use any yogurt maker you have. This is about keeping the temperature of 110 degrees F. for 4-10 hours. In the 1980's we had a heated water bed that worked perfectly. A quart canning jar works perfect. If you have a heating pad test to see what temperature it keeps. Turn it on and test after 30 min. If it doesn't go above 120 degrees you are good to go.
STEP 3
 Heat the milk to 190 degrees F to 210 degrees F. It takes a while to do this even in a microwave. Last time it took me 14 minutes to get to temperature.
WAIT
let the temperature drop to between 110 degrees F and 115 degrees F.
at the high end of the temperature the yogurt will be tarter, at the cooler end the yogurt will be sweeter.
STEP 4
all in one scoop. Or catch it with a fork.
STEP 5
whisk this gently until the yogurt and milk are thoroughly mixed
STEP 6
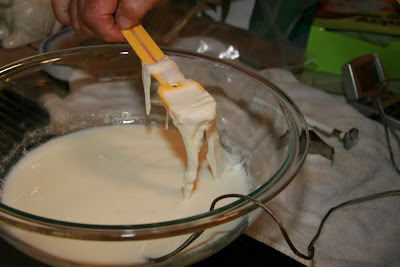
Add the yogurt culture, you just diluted with milk, back into the milk.
Stir and Stir. It's so important to really make sure the culture is all through the milk. Don't make bubbles with that whisk. Use a clean fork.
Pour into your yogurt maker or into a quart jar.
Keep the mixture at 105 degrees F to 120 Degrees F. Never go above 120 degrees F or you will kill the poor thing. You get less separation of the yogurt if you use 110 degrees F.
DO NOT DISTURB DURING THE PROCESSING.
If the temperature is under 105 degrees it will not culture.
My K-tel yogurt maker (bought in the 1970's) takes 5 to 6 hours to culture!
When you can tap the edge of the container and the milk is like soft pudding it is ready for the fridge.


No comments:
Post a Comment