 One pumpkin
 Two pumpkin
 Three pumpkin
 Four pumpkin

Warm Advice from mom, grammie ideas, answers to your questions, how to make or do anything,recipes, hints, thoughts to keep mom's going!
 One pumpkin
 Two pumpkin
 Three pumpkin
 Four pumpkin


Prepare the items below and tell the story of The Body of Mr. Brown. As you tell the story begin to pass the items before they hear what it is. Turn the lights off and read with a covered flashlight.
Head of cauliflower oiled
Corn silk
popcorn kernels
rubber glove filled with cold water and tied at the wrist
peeled grapes
liver or something that feels like it
dried apricots
Chicken bone
cooked, oiled spaghetti
The Story

Happy Halloween!

Click on music to enlarge and print, that doesn't mean this old music will be easy to see, he he!


Do you have some of your master mix around? Here is a great recipe for it!
Cheese-Garlic Biscuits 9 biscuits
2 cups of master mix or Bisquick
2/3 cup of milk (I used buttermilk)
1/2 cup shredded cheddar cheese
2 tablespoons butter melted
1 clove of crushed garlic or garlic powder
Pre-heat oven to 450 degrees F.
Melt butter and garlic fresh or powdered
Stir master mix, milk and cheese until soft dough forms. Drop dough into 9 spoonfuls onto ungreased cookie sheet
Bake 8-12 minutes until Golden brown Remove from oven and brush with melter butter and garlic.
Yum Yum......
If you didn't get this when I passed it along before.....here it is!
.Master mix
large recipe
9 cups of white flour
1/3 cup baking powder
1 tablespoon salt
2 teaspoons cream of tartar
4 tablespoons sugar
1 cup nonfat dry milk (opt) I never use this but add fresh milk when water is called for in the recipes
1 cup veg oil
mix all the ingredients except the oil. Use you mixer with the whisks and slowly add the oil and mix and mix until well blended. OR cut in the oil with a pastry blender until is looks like course cornmeal.
Store in a covered plastic container at room temperature.
Be careful when measuring to fluff the mix and load into the measuring cup with a spoon, do not pack into cup.


 3. Roll dough into a rectangle 12x10 inches. Spread with the softened butter. Mix sugar and cinnamon and sprinkle over rectangle. Sprinkle on raisins, chocolate chips and nuts.
  Roll tightly, beginning at wide side of dough. Seal well by pinching edge of dough into roll.
 Cut into 1 inch slices. Place slices cut sides down in well-greased muffin tin.
 Heat oven to 375 degrees F. bake 12 to 15 minutes until lightly brown. Remove immediately from pan. Place on cooling rack. Place wax paper below rack.
 From a young age I would mail in for product recipe booklets. This is from the Betty Crocker Folk Breads U.S.A. printed in 1973. I promise to share some other fun recipes from my collection.
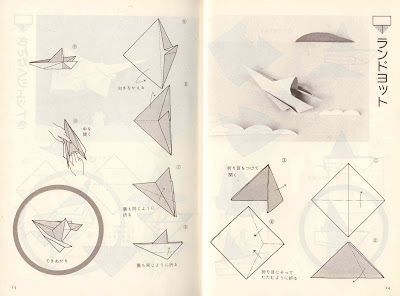
 Bleach boy makes really amazing paper airplanes and I can't begin to tell you how to make those but here are some fun Japanese paper planes that fly very well. Remember to read the patterns from right to left. Where are those who can translate when you need them?
 you can click on the photos to enlarge and print

 Click to enlarge and print
  I must include the music for this beautiful song. If you saw the Saturday afternoon conference you would have heard the children's choir sing it. I loved and learned this as a little child and it remains forever in my mind. I can sing right along! Maybe you'd like to teach this to your children so I have included this for you. If you have a hymn book it is on page 305, a bit simpler version than the original I put above.

The younger two girls and I enjoyed a morning class in feng shui at a conference in Florida. It was a long time ago but I remembered how interested I was in it. The reason? I loved the feeling it gave me. Just look at the pictures I've included and see if you don't get a feeling from seeing harmony and balance.
Feng Shui ( say it fung-shway) is a ancient Chinese art. Very old and full of tradition. It is about the connection between you and your surroundings. This is such a complex art of understanding a person and helping them balance life through home arrangement you would need to study many years to really be able to do Feng Shui yourself. There are however many interesting sources, some much too westernized, but do check your local libray.
I do know how Yin and Yang works. Two energies both different but in balance they are good and out of balance they are...............well lets say a bit crazy. I remember when our son left to serve a mission in Japan. That left the household with 5 women and poor bleach boy, who tried to hold his own ground. It wasn't long before feminine energy was too much for the house hold. Balance was all off. I felt it and it was strong. Another time I remember understanding Chi or balance was in college. I was an art major, studying design. As I tuned my eye to what made a good design I realized I was suddenly feeling a balance, chi. The space you don't use in art is as important as the space you do. Yin and Yang. I think this principle can be seen in so much you do in life.
So now take a look at the simple examples I found in my sewing magazine. If you can find a copy it's Sew News July 2005 " Balancing Act Feng Shui Basics". A great article worth the read.
You might have fun taking a this test to see what your Feng Shui personality is. Go to www.lotusinstitute.com/ Click on the 5 element living link and then take the The 5 Element Personality Quiz. I was suprised at mine. I've never liked stone in my home and now I know why!
This is just a tiny taste of this sudject just to get us started "looking".


I have a fond memory. It is of little handmade dolls given to me as a child by the creative, loving people in my life. My parents built my childhood home in the 1950's. We lived in a motel, though it wasn't called that. It was a strip of little rooms all with kitchenettes but one shared bathroom. I remember riding my tricycle on the walk way in front of the rooms. A very kind lady there made several little toys for me and my sister. I still have one of them and remember her kindness. My Grandmother on my dad's side made several cherished dolls for me and my mom made a little clown over and over for me as I loved it so much I would wear it out every few years. I still have one. In the next few blogs I will show you some of these quick toys. They are made with very few supplies and little work but mean so very much to a child. I've never forgotten mine!
1) Any square of fabric will work. A handkerchief will work, one with flowers makes a nice girl doll. You can made a quick hem on a fabric square.
2) fold the square corner to corner as in diagram A.
3) put a small ball of fiber fill or a scrap of fabric made into a ball, or for me a spinner I'd put a ball of wool in for the head. Tie tightly a bit of thread or yarn around the ball to form the head. diagram B
4) Diagram C Here is where it gets a Little more tricky. Just remember it's a clown and they have loose, full sleeves etc. Treat each point of the handkerchief as one of the clowns limbs. You can follow the photo above. Pull the right hand up and let it be the top. Then pull the left leg and let it be the top. You will sew in little whip stitches the arms (you don't have to start at the top of the hand as we tie it later). Start at the wrist and sew until you see that you can not sew further without getting into a leg. So the pattern is sew from wrist most of the way to the body. Sew from point of foot to most of the way to the body.

I left one foot open to show you what it looks like before you fold it in and sew it.
5) You will now have arms and legs sewn but the tummy will be loose and open. It can flip any way the child moves the clown or you can tie a colorful yarn, or piece of fabric around his waist.

Now wasn't this easy and fun? This came from a book so old I doubt we will ever see it again. So enjoy this cute little clown.

